Pages

Monday, December 23, 2013

More Christmas Centerpieces

Hi Everyone, Thanks for stopping by to see the other centerpieces.  My event went well but not too many good pictures...boo!  I do have to tell you what happen.  So my daughter was able to help me set up since I have a shoulder injury...torn rotary cuff.  I am ok to pick up some things, but not able to stretch or put up the canopies on my Tabletop Shop. She was a huge help in setting up the table but because the car was so packed I failed to take a few things that I really needed....hence the poor pictures of the event.
Anyway, while we were in full swing, I hurried over to clear a table and TRIPPED on a coat that was hanging off of a chair and fell SPLAT on the cement tile floor!!! OMG...I was so embarrased...the Dickens Carolers went silent, everyone stopped in their tracks...even Santa jumped off his chair and ran to my side.  A nice gentleman quickly grabbed me by the shoulder and was ready to pull me up, when someone yelled...NO don't move her!!! I was SOOOOO embarrassed.  But every bone in my body was SCREAMING!  I thought for sure I broke my wrist.  I quickly picked myself up and wanted to run away, but the show must go on.  I stayed, finished the event, cleaned up, then went to the ER.  Nothing was broke, thank God, but I feel like I was hit by a bus!  I am so, so sore. Every bone in my body hurts. Ugggh.  I will never forget this holiday party that's for sure!  I heard someone say...WOW, she hit the floor like a sack of potatoes!!  LOL...thanks!
Ok, enough of that, lets move on to the centerpieces. The Candy Cane and the sleigh are both from My Scrap Chick. So easy to make.  Each of the centerpieces use at least 3 files. Each had a box as the base and then I used two other files for the main design.  
All in all, I made 6 centerpieces, with the same color scheme.  Added bows and accents as well to make each whimsical centerpiece shine and twinkle in Christmas lights.  


My Scrap Chick has some wonderful files.  Very quick and easy to put together.  Not to mention, their cuteness is beyond words! 


Both the Santa Pants and the Elf Shoes came from SVGcuts.  These are a bit more detailed, but really fun files as well.  
Friends, thanks for stopping by again.  Have a wonderful holiday.  I will be in touch later next week with something new.  
~Margie  


Thursday, December 19, 2013

Xmas Centerpiece


I wanted to give you a sneak peak of my Christmas Centerpieces...Look for more pictures and a "how to" on Sunday.  
Enjoy!
~Margie

Wednesday, December 18, 2013

Merry & Bright

I wanted to show a quick project I made last week with the My Scrap Chick File, Bella & Baxtor Elves called Stringing the Lights.  I LOVE the lights in this set so I enlarged one of the bulbs and made a giftcard sleeve out of it.  It was really an easy file to create. I add the verse from My Scrap Chick Merry and Bright Christmas Word Titles. What a cute gift to give to a friend and hang it on the Christmas Tree as an ornament.  

My Scrap Chick is SELLING THE STORE!!!


Choose from over 550 easy-to-use patterns for a variety of paper crafts. Create handmade cards, scrapbook pages, gift tags, treat boxes and more.
BUY THE STORE! Sale Extended.

I love all of their kits.  They are so easy to build.  This is a MUST HAVE sale!  With over 500 kits in stock you are paying UNDER .25 per kit...WOWZA!!!

I have some ADORABLE Centerpieces to share with you next time....you are going to have to see this, they came out so darling!  Hoping to get them posted on the weekend.
Thanks Friends!

~Margie 


Monday, December 9, 2013

Light bulb Christmas Gift Card

Just a cute little gift card I wanted to share with you.  I used the set Bella and Baxter Elves from My Scrap Chick.  I enlarged the tiny light bulb and made two of them, gluing the ends together so the bulb would open to the gift card enclosed.  
Then I added the words Mary & Bright from Christmas Word Titles and embellished it with a button and cord. 
It was very simple but I like it.  Sometimes the smallest things has the biggest impact.  
Hey, we are having entirely too much fun over at My Scrap Chick...stop in at the store and see what's new!!

Until next time...

Thanks for stopping by...
~Margie  

Thursday, November 14, 2013

The Tin Can Man


I love making clever packaging.  This cute little "Tin Can Man" was made from a can of creamed corn I had in my pantry. I used a CLEAN CUT can opener to cut the lid open, so it wouldn't have any sharp or jagged edges. Next, I measured and cut papers for both the lid and around the can itself. Then find a cute, simple design to apply as a scene to this background paper. Mine designs came from My Scrap Chick, Snowman Gift Card Holder and O Christmas Tree. To the lid, I added the Puffy Star, snowflakes and a little bit of bling. At this point, you can add a handle, if you would like.  It took me all of 30 minutes to complete this piece. Makes a great gift box for a pair of socks, a tie or a scarf, or even a candle would be darling!! 
Thanks for stopping by friends!  
~Margie 

Thursday, November 7, 2013

Rainbow 1st Birthday Party


A few weeks ago Desi, from Desiree Chocolates gave me a call to ask if I would be available to build party pieces for a 1st Birthday Party.  In 2012, I designed Jada's Jungle, a Baby Naming Party for a friend of Desi's. So it was a surprised to hear Jada was already turning one!  Gosh, babies grow so fast don't they?  Of course I was thrilled she asked me to do another party for her.
You guessed it, it was a Rainbow theme!  I was asked to come up with a large piece to be placed on the main table that had some height, menu cards for the sweet table, a couple of banners and cupcake picks.  You know me, I can't do simple..I have to GO BIG everytime!!


I started out with the rainbow from the My Scrap Chick  Lucky Rainbow Bears and a sun from Shape Card Vol. 1  I added some simple font and used my foam dots to give it some dimension in my layering. I used ink to edge the clouds and the sun, and made all pieces double sided.


The pot of gold file came from  SVG Cuts as a Halloween piece, but I changed the color and made it a gorgeous pot of gold complete with a little BLING!!

Adding the rainbow to the pot of gold made the perfect centerpiece. Like I said, I double-sided this to give it a full look from any angle.


Next I did two banners. 


Don't worry, I caught that the T was placed backwards before I glued it down.  LOL! 


Desi, always likes me to make cupcake picks that can be used in almost anything she whips up.  I like to personalize these pieces as well. 
The Menu Cards are actually one of my favorite pieces to build.  They really tie everything together on the table. I like to make them very detailed. Look up my other parties to see the crazy menu cards I have designed.     


 Have I mentioned how YUMMY Desi's  Sweet Tables are???? Look at all those delectable desserts! 
Here are a few pictures of the actual party.


Thanks for stopping by...if you haven't noticed I am "playing catch up"....I am a bit backlogged in my blogging this month so comeback in a day or two...better yet, become a follower and see whats next.  I did an event for 800 guests, I am finishing up some menu cards with a Chicago Theme, and I have done a few more things for My Scrap Chick. Tons of things to share with you!! (Ohhh, I almost forgot...I just blogged about my Tabletop Shops...my baby!!!) 

Thanks friends, chat with you soon!
~Margie


Wednesday, November 6, 2013

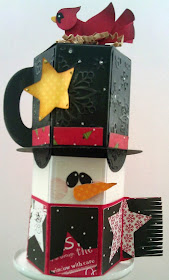
The Snowman Mug Shot


Old Man Winter is right around the corner, and those of you who know me, know that I love cute little snowmen!!  I have a whole collection and put them up for the holidays, but leave them displayed until February, so I can enjoy them all season long.
This little guy came from My Scrap Chick in the Full Cup Treat Holders kit.   It comes with 3 Handled Mugs.   Can you believed I used all three mugs in this one piece??  I absolutely LOVE the way it came out. You can fit two gifts inside this snowman box. I am going to start from the bottom and go up to explain how I made it.  
The scarf, the Demitasse size cup, needs to be slightly enlarged so that the Big Cup, the snowman head, can slide inside. 


I folded the handle to the back of the Big Cup (head) before sliding into the scarf.  You could cut it off, but I wanted to show it as a mug.  You now will have a little room inside the scarf to tuck 
away a small gift.


The Scooped Cup, the Top Hat, is turned upside down and becomes the lid.  The scoops actually slide into the head and hold the entire piece together, nice and snug.  Leave out two scoops on the sides to look like earmuffs.  I have since added POM-POMS to these...and OMG, it's just so stinkin' cute!! 
Include a second gift to the snowman's  head.  It's big enough to add a cello bag filled with cookies or candies, tied with a cute matching tag.  Keep your cost way down on the actual gift, because like I said, these boxes are part of the gift.    
 The embellishments really make this piece pop!  .  


The eyes, carrot nose and the star came from My Scrap Chick Winter Friends Treat Boxes.  I added the Cardinal from The Snowman Collection in a little shredded nest plopped right on top of the hat.   
All in all, I LOVE this little guy...
           isn't he so cute???? 

Thanks for stopping by and....oh, I will be making some other pieces with this same set ...so drop in again and see what's cookin'!
               ~Margie                

Sunday, November 3, 2013

Tabletop Candy & Sweet Shop

Tabletop Hot Chocolate Shop
Polka Dots and Parties Tabletop Shops & Sweetie Carts are rentable pieces, available for any special celebration. From whimsical to elegant, this charming canopied tabletop offers a deliciously decorated theme buffet to compliment any occasion.  Elegant apothecary jars, clear to bright colored candy vessels, beautiful baskets, and tabletop trays are all available to display your special treats.  Our pretty pedestals and decorative stands can be added to any Tabletop Shop.  A Party Stylist can design a Tabletop just for you, adding decorative ribbons, banners and personalized signage. A uniformed, Sweetie Assistant is available to refill and attended to your table during your event.
Maybe you're looking for something simple like a Coffee and Donut Bar for an employee meeting or a Ice Cream Shoppe complete with Hand-Scooped Ice Cream and Toppings?  We can personally design any themed Tabletop Shop just for your special occasion!! This piece is very versatile. A Tabletop Shop can be set up quickly at any venue using a 6' buffet table.
The Old Fashion Candy Shop-
No Candy or Sweets included
  • 2 Hour Rental
  • Delivery/Pick-Up 
  • Construct/Dismantle 
  • Canopy 
  • Tablecloth
  • 10-15 Assorted Old Fashion Jars, Stands & Scoops
  • 50-75 Clear Cello Bags

***Optional Upgrades Include:
  • Addition Rental Hours 
  • Sweetie Assistant to keep your sweet shop clean and full to the brim throughout your event
  • Candy and/or Sweets provided by one of our Preferred Vendors
Sweetie Tabletop Shop-
No Candy or Sweets included
  • 2 Hour Rental
  • Delivery/Pick-Up 
  • Construct/Dismantle 
  • Canopy 
  • Tablecloth
  • 25 Jazzy Jars, Pretty Pedestals, Plates, Trays, Scoops, Tongs and Spatulas
  • Sweetie Assistant to keep your sweet shop clean and full to the brim throughout your event
  • 75 to 100 Colorful or Clear Cello Bags

*** Dessert Plates, Napkins and Forks not included

**Optional Upgrades Include:
  • Addition Rental Hours
  • Sweetie Assistant to keep your sweet shop clean and full to the brim throughout your event
  • Party Styling-A beautiful array of ribbons & bows, tied or threaded among pieces, jars and pedestals.
  • Candy and/or Sweets provided by one of our Preferred Vendors

The Million Dollar Bar-
No Candy or Sweets included
  • 2 Hour Rental
  • Delivery/Pick-Up 
  • Construct/Dismantle 
  • Canopy 
  • Tablecloth
  • 25 Jazzy Jars, Pretty Pedestals, Plates, Trays, Scoops, Tongs and Spatulas.
  • Sweetie Assistant to keep your sweet shop clean and full to the brim throughout your event.
  • Colorful or Clear Candy Cello Bags
  • Party Styling-a beautiful array of ribbons & bows, tied or threaded among each piece, personalized candy tags and sweet treat menu cards provided
*** Dessert Plates, Napkins and Forks not included

***Optional Upgrades Include:
  • Handmade, themed candy favors treat boxes and/or bags
  • Handmade, themed personalized banner. 
  • Candy and/or Sweets provided by one of our Preferred Vendors


     -


Sunday, October 27, 2013

Miss Jane's Cupcakes


My daughter told me she had heard of a GREAT cupcake shop in Naperville and I have been meaning to check it out.  Every time I head north on route 59, I drive right by Miss Joan's Cupcakes on the east side of the street. Two weeks ago, I made it a point to stop in for some yummy desserts. When I opened the door, I was surprised to see I was 4th in line. WOW, they must be good, if there is a line...right? 
The inside of the store was bright colored and cheerful.  For a nice break, a few tables were available for guests to sit, relax and enjoy their sweet cupcake.  As one person paid for their order, the door swung open to more guests. Holy Cow...I have been missing out on this place!!

  
The display case was filled with these pretty cupcakes, all dressed and decorated each matching the name to their iced decor....S'Mores, Red Velvet, and Carrot Cake to name just a few of my favorites. The swirls were perfect and uniform.  The colors and decorations reflected their themes. While onlookers made their choices, I too chose a half dozen I would be taking home for tonight's dessert.  
Since I was last in line, I actually spoke with Miss Joan.  What a sweet gal.  I'm hoping we can work together on an event in the future.

Miss Joan explained how she made several classic flavored cupcakes everyday and some specialty flavors each day as well.  "Like" her on Facebook to see their flavor of the day.  Word of warning...get there early, she sells out DAILY!!
So, I bring my tasty treats home and my husband says, "Oh can I have one of these BEFORE dinner." The mom in me says, of course NOT, you will spoil your dinner!  LOL!! Rave reviews came from our dinner table that night!   
My daughter came home from college for the weekend and was thrilled to find cupcakes under my dessert dome pedestal in the kitchen.  We all agreed... Miss Joan's Cupcakes are to DIE for!! 


If you are looking for something special, Miss Joan will do special orders. Place your orders early, this gal is busy, busy, busy!! 
I decided to see how the cupcakes fit in my party favors...OMG, just darling!!!

Baby Showers!

Cheerleading or Sporting Events!


Special Holidays!

Halloween!
Have a wonderful Halloween friends, and be sure to stop in Miss Joan's Cupcakes for these Special Treat!!  
Thanks for stopping by my blog!  
~Margie

Friday, October 25, 2013

Halloween Nugget Matchbox


Hi Everyone, I wanted to share my first My Scrap Chick projects with you. The chosen kit was Franken-tastic. It was so easy to use.   I loved changing up the colors and add a few pieces to the Sweet Nugget Matchboxes kit to make this adorable treat box. The intricate cut on the cobweb gave the box a spooky, creepy, kind of look; with a touch of whimsy.  I think I might fill it with wrapped mini bar candies and give to a friend for Halloween. 

Thanks for stopping by today everyone.  Make sure you sign up for the My Scrap Chick Newsletter, so you can see all of the wonderful ideas the "chicks" are sharing these days!
~Margie
DT My Scrap Chick


Wednesday, October 23, 2013

My Scrap Chick Centerpiece

This is my second design with My Scrap Chick's Franken-tastic. I decided to make one of my original centerpieces. I normally use Cake Pops in this piece, but for Halloween, I used Tootsie Pops! Who doesn't love a Tootsie Pop, hey? This actually holds 14 Tootsie Pops. The little Franken-tastic Monster was a perfect image for this Halloween centerpiece. By edging with a bit of dark ink around each image, and adding small beady eyes, I gave him that "deer in the headlights" look, and layered all of the components to create a crazy, Halloween centerpiece with goodies for all.  
All of my centerpieces are double-sided and sandwiched with a  pixie straw in-between.   Now, I know, you all always ask...how did I make this centerpiece? This is something I created myself a few years ago. I used a container and a ring to hold these pops in place.  The cupcake liners are used as a filler and for a little decoration.  When you use cake pops, you really need these liners to catch the crumbs and keep the oils away from staining the base. The My Scrap Chick Design Team has some fabulous holiday ideas to share with you next month too...see you then.  
Thanks for stopping by.
DT Margie 
My Scrap Chick


Sunday, October 13, 2013

Franken-Tastic Little Goodie Bag

I wanted to share a goodie bag I made with one of My Scrap Chick Sets.  This one is from Franken-tastic!! It was truly an afterthought I made from some scraps, but I think it came out pretty cute after all!   I layered my images on the top half of the label as a "bag apron and tucked the other half inside the bag leaving plenty of room for goodies.  Hope it gives you a little INSPIRATION! Don't throw away your scraps or mistakes; use them to create something different and unique!
Thanks for stopping friends!
~Margie  

Dracula and Frankenstein Dispencers


OMG, I LOVE, LOVE, LOVE these little guys from My Scrap Chick!!!  They just have SOOO MUCH personality!!  When you open their mouth the candy spills out.  I think the polka dot paper really looks cute on both of these pieces.
I thought it would be cute to make Frankenstein and the bride of Frankenstein.  I just punched a hole in the top of her head and knotted a piece of tulle through the hole for her vale.  I added big lips  and a little blush to her face.  I bet it would have been cute to add a bigger BLUE eyebrow (uni-brow with blue eye shadow!) as well....hahaha!!  She is wearing jeweled earings...I am thinking next time I will add hoops!
Until next time!
~Margie