Showing posts with label Theme Parties. Show all posts

Tuesday, June 17, 2014

BBQ Bash

Hi friends, 
Who doesn't love a Summer BBQ?  Let's jazz it up a bit with some darling menu cards for your picnic tabletops. All of these cards were made from just 4  My Scrap Chick files.
What a cute addition to any party! How cute would these be in a Circus Theme, or 4th of July? Add some ribbon bows or buttons to give dimension. My Scrap Chick has so many wonderful files you could use as menu items...like watermelon, some-mores, concessions, even ice cream sundaes!!

Easel cards are intended to be used as a greeting cards, party invites, or announcements; though, I just LOVE to use them as menu cards on my party tables!

Files used:

Hot Dogs and Hamburgers        
Lemonade
Banner

Enjoy the start to a great Summer!  Thanks for stopping by!
~Margie


Tuesday, August 28, 2012

Irish Themed Bridal Shower

Last week I worked on a 60 piece bridal shower...30 favors and 30 flowers with an Irish theme.  So I set out in search of 4 leaf clover scrapbook paper...with NO luck!  So, what's a girl to do?  I printed my OWN paper!  I love that option, I didn't even have to leave the office.  I wanted something very simple, not too busy and more white than green.  I found the perfect kit at Nit Wit Collections.  I hold their commercial license so if you are looking for something special, you can check out the site, find your favorites and give me a call.  I probably have the kit and if I don't I will purchase it!  I love their stuff, MaryFran is an amazing artist.
So, I wanted to put a little twist on the bridal dresses...you know me, I can never just cut the darn box and be done with it.  Funny, I actually took a picture of a simple design so you could see exactly how I jazzed it up...you'll laugh at it's simplicity. As for my design...it's one of those...'why didn't I think of that' type boxes!  
The one in the middle is the simple favor box pattern.  I used one sided printed paper, very simple with tag attached.  The 4 leaf clover dress on the right, is the paper I printed.  I added a solid light green paper to the bodice area.  The first one your left, is just a plain white dress with a separate white overlay that is dry embossed and glued to the skirt area. (I turned the printed paper over to the non-printed, plain white side to make the skirt)  The bodice of the printed piece was also used as the ruffle...printed side facing toward the front.  Hope you got all that!  I confuse myself sometimes!

I really, really love the green plaid dress.  I used very inexpensive paper, and added the white embossed overlay to the front.  I jazzed it up with a little bling, added a simple tag with a pop-dot, and a ribbon to the midsection.  I can see so many possibilities with this pattern.  How about red and white checks, or a cherry print?  Maybe add an apron...great 50's party or BBQ favor!  Love, Love, Love that!
Those of you who know this pattern know it had a silly latch in the treat area.  I hated that piece, so I cut it off and tucked in the tabs to make the box a little sturdier.  I added two mini cupcake liners to the inside just so the treat won't slide all around. (they do make rectangular liners that might work as well)

So here's a close up....I just add a little bling to the flower centers.  Really pretty!  I made 59 of these and  1 single favor for the bride with a little bridal tulle attached to the back, as a veil.


Next, I made 6 Pretty Poke single stem bouquets adding a clear lolli to the center (it had a clear, pastel heart candy in center of the sucker) really pretty.  I used the 4 leaf clover paper as a flower, and a white flower layer with a couple cupcake liners to each stem.  I have to say, I get so many questions as to how these flower are assembled.  I wish I could tell you...but it's my own design.  A girl has to keep some secrets to herself.  I will say, it's not in the materials used, or even the layering process.  I use a tool to get it all to work as one.  BELIEVE me ...it took me a long time to come up with this piece.  Maybe Martha Stewart will have me on her show, THEN I can teach you all the How To's! Thanks for understanding.  
   

Ok just a few more pictures of all of the pieces as one party.  I like to set up my orders in my formal living room before I deliver them. 


Lastly, a preview of my next blog entry
Stay tuned.....


Thanks for stopping by!  
~Margie


Sunday, August 19, 2012

Summer Events

This was taken in my formal living room before I delivered the party.
Hi Everyone!  

Whew!  It's been a very busy Summer for me.  June, July and Aug were filled with a lot of fun, fun parties!  A Summer event for 2,000, signage for a Chicago library event, 300 Tinkerbell party favors, a couple of Bar & Bat Mitzvah's, and many samples for future parties.  I have been so busy for the last few months. Oh, how could I forget Maggie's 2nd Birthday (my granddaughter, I'll add a blog entry for her party this week).  In addition to these Summer events, I am working on something new for the Fall....(Top Secret Stuff).  This week I am building centerpieces and favors for a bridal shower and several pieces for a twins flower themed birthday party, I know you will just love. I will post photos AFTER these parties have taken place...I don't want to spoil any surprises. 

One of the most memorable parties this Summer was a Tinkerbell birthday party for a 3 year old little girl. I was hired by my friend Desi, at Desiree Chocolates to build 300 themed favors, cupcake pics, a birthday banner and some tags and menu cards all with the Tinkerbell theme.  So I put on my thinking cap and came up with some darling favors for both girls and boys, which I displayed on a Pottery Barn severing pedestal that served as a pretty neat centerpiece while filled with the favors as well. I used this same sever as a drinking glass tower at my daughter's bridal showers.  I like it so much, I wouldn't mind a second so I can place one on each end of the dessert table.  


With my "thinking cap on" I knew I wanted to use my favorite Double Dot Papers from Bo Bunny.  The color pallet  was Hot Pink, Lime Green, Lemon Yellow...and I threw in a little blue and orange as well.  It all worked perfectly. 


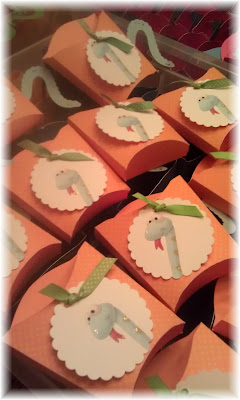
After this never ending pile of scrap paper and a few trips to Archivers, I finally came up with a zillion favors...well 300 darling favors.   I decided to go with a french fry box...easy for the kids to fill up the box with the wonderful desserts from Desiree Chocolates and enjoy the party.  But I needed something with a Tinkerbell theme.  Well I have to say, I am so excited with the end result.  

Tinkerbell got some wings add on.
Crock got a tail added on the back of the box.


The snake got a squiggly tail added onto the back of the box.

The lizard, he got a tail too...he was my favorite!

And Captain Hook, got his HOOK added to the back of the box.

As I mentioned, I designed a few pieces for Desi's dessert table as well. She needed matching candy container tags.  If you look under the "Tag" blog entry, you can view how I normally design a tag, but these needed to be a little different.  Desi's candy containers are martini glasses so the normal hang tags wouldn't work.  I came up a different style and I just love the way they turned out.  Fits the stem perfectly.  What do you think?


I also made cupcake picks...both regular and mini size, all with a mixed birthday theme.  Don't forget to add a little "bling" to each one, it's nice to see a bit of shimmer in the light. 


Everything looked so nice, but I have to tell you...it took 3 helpers, myself and 7 full days to completely build this party, working 10 to 12 hours a day.  Yes VERY long, BUT...very worthwhile.  I LOVE every piece.  I have to admit, this was the cutest party I have ever  designed.  I wanted to show you a few more pictures of the process, just in case YOU get a call to design and create 300 party favors...ENJOY!


~Margie


Saturday, May 12, 2012

My Story-Event Planning and Party Stylist

It's been brought to my attention that my blog is a bit confusing when I talk about both of my positions, Event Planning and Party Styling.  So let me explain.  Several years ago, I started out planning events for large corporate companies and community country clubs.  Over the years, I have planned company picnics, corporate events, holiday celebrations, country club and school festivals.  Along the way, I met Party Connection Events, and they were able to provide many wonderful pieces for my event planning business.  As we worked closely together, I was honored when asked to be an Event Planner with them! We make a good team and plan events for 500 to 2,500 guests.  We've been together for about 5 years.  
For the last couple years, I have been drawn to Party Styling.  I love themed tablescapes, and the tiny details...like party favors, centerpieces and goodie bags.  In my opinion Party Styling is not so much about the planning stage, as it is the building stage with matching pieces to enhance the party through creativity. Designing and creating party favors and centerpieces have become one of my passions.    
For the 18 months or so, I learned how to use several software programs, design with digital art, and use cutting machines, and at the same time I incorporated my love for crafting to help me add the "bling" my party styling.  With that...Polka Dots and Parties was born!  
So what's the difference?  Event Planning for larger corporate events, like company picnics, country club events, and holiday parties I'll do through Party Connection.    The small details, the party decor, the extra special touches that give a party it's "BLING"...now that's Party Stylin' at Polka Dots and Parties!!    
I  create many, many, party favors, centerpieces, banners, cupcake pokes, goodies bags and creative packaging, all of which I love, but my multi-use centerpieces are my all-time-favorites!  I have a few dessert companies that are now using my centerpieces to hold their cake pops and chocolate desserts.  I love making favors for bridal and baby showers..  Just so many pretty pieces to choose from.    
I hope this clears up any confusion as to the difference in my Event Planning and my Party Styling.  As I combine them both...my world has EXPLODED!!    So does this make me a "Party Stylin' Event Planner" ....hahahaha...sorry Ellie, just a little event humor!

Thursday, April 26, 2012

Let us plan your next company event!!


So, I thought I would tell you a little bit about my "other" job.  Yes, I love Polka Dots and Parties, but it would have NEVER come about, if not for Party Connection Events!! They have given me this wonderful opportunity to not only, plan events with them, but also provide party favors, centerpieces and party enhancements for their special events.  I was so excited and thankful for the opportunity that this is how Polka Dots and Parties was born!  
For the last 10 years, I have planned corporate events, holiday parties and company picnics.  In 2006, I met Party Connection Events. I began working with them the following year.  I plan several company picnics with anywhere from 500 to 3,000 guests.  I manage and execute these events from start to finish, hiring vendors, entertainment and catering. As the on-site supervisors, we attend these picnics making sure everything runs smoothly on event day.  The best part about planning is seeing all of the smiling faces of those who attend. From Push Carts to Pig Roasts, Tabletop to Big Top, Music, Magic and So Much More PARTY CONNECTION EVENTS plans it all!! So we say it like this....
PICK HOW MUCH FUN YOU WANT TO HAVE!  

Party Connection Events has EVERYTHING you need!! Contact Me  to plan your next event and supply you with some THEME favors as well!!

Sunday, March 18, 2012

Bow and Babes~Once Upon a Time

Hi Everyone,
What a beautiful weekend in Chicago.  We went from the dead of Winter to a beautiful Summer afternoon...I even have the air conditioner on, can you believe it?  This is nuts, but I am not complaining...just lovin' it!  
I am so excited about my Polka Dots and Parties Blog.  Not only am I having a GREAT time making all these centerpieces and favor boxes, but I love sharing it with you too. I have even starting Tweeting a bit!   So far, I am only blogging 1 day a week...Sunday, but hope to add on another day midweek.  I just need to find a extra time...who doesn't need more time, right?  So without further ado let's move to some of last weeks projects.  
I have one Event Designer and 2 brick and mortar stores who are purchasing my pieces so far...hoping for a few more. I will tag them on my blog and post pictures of the pieces they have chosen.     Check out their links...one never knows when you might need something special that they might be able to provide to you.
Last week I created a couple centerpieces for for Bows & Babes in Naperville, IL. Owner, Anne Miller has a beautiful little shop right in downtown Naperville with everything little girls love, lots of pink bows, hair bling, tutu's, dress up clothes...a little girls dream.  Bows and Babes also plan fun birthday and dress up parties for little girls.   So my Pretty Pokes Cake Pop Centerpieces will be a adorable addition to their parties. Cake Pops?  Next week I will have a place for you to purchase those cool new CAKE POPS too!
I thought you might like to see the details on each Pretty Poke.  Now, I am NOT a photographer, so my pictures are NOT great, but promise to work on this too.  I don't think you can really see the dimension of each piece in these photos.  Each are layered 3 or 4 times and are double sided. More details show up in the final centerpiece.  


This Pretty Poke Flower reflects the child's age. 

I wish I would have added a polka dot bow to tie the slippers together.

After adding stitch lines on the green checked fan I added a brad to the center
7 Piece Princess Bunting (missing ladybug)

Ok, drum roll please...My favorite Pretty Poke Centerpieces.  Pretty Poke Ballerina Centerpiece:


You are probably wondering why the wooden cake pops?  Not having yummy cake pops on hand everyday, I made these cake pop props to add to my centerpieces...I actually painted them since I took these pictures and they really do look yummy!!
Lastly I wanted to show you a second centerpiece called Once Upon a Time.