Thursday, November 29, 2012

It's a Jungle out there!

A few weeks ago, I was hired to build a Jungle Themed Baby Naming Party with emphasis on zebras, zebra stripes and prints...so off to the workshop I went. I made a ton of zebras, well I shouldn't really say a TON, I made a dozen, but I make everything double sided, so I actually made two dozen zebras, back to back and mounted them on pink stripy-pixie straws. I call these Pretty Pokes and they are my favorites, I love these darn things!  You can poke them into just about anything.  


How cute would these zebras be on a carousel?  I might have to build one some day.  In fact, I have always wanted to do a circus theme party because I have some darling favor box patterns and many new designs in my little pea brain, twirling around.  At Party Connection Events, we have some wonderful clowns, face painters, wavy mirrors, carnival games, popcorn and ice cream carts. Many cool pieces that would be a perfect addition to a carnival party.  It's a "circus" over there, so give them a call!!     

In addition to those zebras, I made some cute cupcake pics with a herd of jungle animals.  I mounted them on solid and polka dot backgrounds.    Again, I like to make them double sided, so three dozen pics turn into six dozen animals. I LOVE the way they came out.  Very simple, but adorable.  Believe it or not, there are no cupcakes included on this dessert table, but the pics look cute poked into anything, not just cupcakes. 


Let's see, I also made some very large layered palm trees for this party.  Yes, they are flat and double sided, but I was able to secure them with flat sticks so they were firm and would stand up while poked into a narrow jar of candy. So with two palm trees as the centerpiece, I really wanted to hang a cute personalized sign between these trees.  Easy-peasy!  I had an idea in mind, so I cut and built it!  I love starting from scratch and coming up with my own ideas. I added several layers, sculpted leaves and the baby's name in zebra print and hung it from the trees with clothes pins. (I wish I would have colored those clothespins with matching paper)  Very, very cute. It seemed to really pull the theme together.


I can't forget the little monkeys hanging in the trees. Their curly tails make it really easy to hook them in the trees or even on the cupcake stand.


As I was building these cute little guys, I was thinking how cute they would be to hang on a Tabletop Candy Shop with our jungle themed canopy.  


Desiree Chocolates hired me for this Jungle Party job, Thank again Desi, it's always fun to work with you!  Stop by her website...she is totally AMAZING!! Her sweet tables are out of this world!  Believe me, I know...every time we have a meeting, I go home with a sweet tray of sweet eats.  By the time I reach the highway, I have sampled way too many goodies.  It's a chocolate high for me all the way home!  <GRIN!>

So without further ado, let me share the pictures Desi shared with me of the party!  Thanks Des! 

  
Thanks for visiting!!
~Margie


Sunday, November 11, 2012

Another Tabletop Shop


Hi Everyone, 
I posted another beautiful,  Tabletop Candy Shop on my other blog today and thought I would give you a peak as well. It's the Vintage Christmas Shop.  I won't post any details here because you can find the information on the other blog, but I have to admit...the pictures just don't do my tables justice.  They really are beautiful; trust me! These Tabletop Shops are RENTAL PIECES from Party Connection Events. The basic rental comes with 20-25 pieces.  It's a DIY, so YOU fill it up with your own goodies and party decor. (candy and desserts not included) 

This week, I am working on another Christmas Tabletop Shop and a Baby Naming Party with a Jungle theme for a friend...so check back next week for some cool new paper piecing ideas. The next Tabletop Shop will be filled with handmade decor!

Until then, thanks for stopping by!
~Margie  

Tuesday, October 30, 2012

Boo...it's Halloween!

Boy this is really a dangerous time of year with all this CANDY around!!!  I actually have a Tabletop Candy Shop set up in my dining room so I can work on it.  It's a Halloween theme so I need to finish in time for few neighbors.  But, I wanted to show off a Candy Halloween Centerpiece.  I know you have seen these on Pinterest but I used a ginormous cookie jar. 


I did insert a tall glass in the center so I can actually add flowers or candy wands.  Really cute!  Can't wait to eat those PEEPS!!!  Yummm!


On to the Tabletop Halloween Shop.  I love the look of this little shop when the lights are dimmed and the little hanging lanterns are all aglow, the wall spiderwebs shine and shimmer, the ghost candles are lit and the spider globes swirl with a glow in the dark look...the Tabletop Shop looks AMAZING!!  LOL!!  It's PERFECT for a Halloween Party!!  Check out the Tabletop Candy Shop for more information. 
(by the way...I know you are all going to ask...where did I find those cute battery operated spider globe candles...I got them at HOMEGOODS!! Out of 3 stores in our area...I had only seen those two...I think I got the ONLY PAIR!!  Hoping for a Christmas version!)  LOL!


Tuesday, October 23, 2012

The Original Tabletop Candy Shop


How Sweet it is!! 
I am so excited to finally be able to share this wonderful news  with everyone, so here goes..... 


Our new venture is...(drum roll please) the original,  
TABLETOP CANDY SHOP!!

Polka Dots and Parties and Party Connections Events have formed a new partnership…it’s called the Tabletop Candy Shop!!  From whimsical to elegant, this charming, canopied tabletop offers a deliciously, decorated theme buffet to compliment any special occasion. Elegant apothecary jars, clear to bright colored candy vessels, beautiful baskets or  tabletop trays, as well as unique pretty pedestals all  included with the rental.    

For more information about our Tabletop Candy Shop please visit the  Tabletop Candy Shop  
Thanks for stopping by!
~Margie


Monday, October 15, 2012

Happy Haloweenie

Hi Everyone!!!
I know, I have been out of the loop for a while, but I promise...I have good reason.  I think the big reveal will be ready next week.  Can't wait to share! Most of my time was spent in shopping...who doesn't love that?  
I thought I would share a few pictures of some Halloween Favors.  I actually made these last year, but they are truly worth repeating.  I will have a couple new banners to show later in the week as well.
I can't begin to tell you how much I LOVE these cute little treat boxes.  I purchased the SVG file from My Scrap Chick.  Plenty of room for candy treats.  Of course, kids love the goodies, but I really think friends and co-workers would love and appreciate the time you put into making the box.  The cute favor is just as important as the goodies inside, don't you think???


I searched and searched for a candy corn image to make this darling banner.  Low and behold...I found the pattern on the same wonderful site as the favors. I added the letters, colorful Halloween fabric and festive tulle between the letters...it came out so darn CUTE!    Last year, I was a newbie using these SVG files, this year I am an old PRO!!  I saved the banner and am using it again this year.  My mantel actually looks a little better this year than last...I added my collection of pumpkins to give it a nice holiday look.  You will be able to see it in another blog entry later this month. Well, I am off to the hardware store to purchase a one stinkin' double headed screw that wasn't included with a curtain rod...sheesh!!  


Oh by the way, on Saturday I have an outside Halloween event for 800 guests!!  Kettle Corn, Haunted House, Hay Rides....500 pumpkins, should be fun!  Hoping to post those pictures on Sunday, so come-on back!    Happy Fall...enjoy your week!

~Margie  

Friday, October 12, 2012

I'm Late!


Hi All!!!  

I am sorry I haven't blogged in a while...October is such a busy month.  I have an event for 800 next weekend and I am trying to get a new piece ready to be photographed and introduced.  So I haven't forgotten about you here. 

I added some pictures from a Halloween event I planned a couple of years ago.  I had ordered 500, mixed sized pumpkins and what was delivered was 500 VERY SMALL pumpkins!!  I had to run out to the nearest pumpkin farm and pick up 100 medium to large pumpkins for my patch!!  YIKES...the things planners will do for their events!!  LOL!!! 

I also remember having to pick up 1,000 taffy apples from a caterer and repackage them for a large event...OMG...we never laughed so hard! At that time I had a mini van and it smelled like carmel nut wagon for MONTHS after!   

Thanks for stopping by! Chat with you soon!  

Margie

Tuesday, September 18, 2012

Happy Fall Ya'll

So this past Sunday I decided to make a couple boxes that I hadn't tired yet, both SVG's that I purchased last week.  A Pumpkin from My Scrap Chick and an Acorn from SVG Cuts.  I loved them.  Both were pretty easy to make...the acorn was a bit harder, but after making one I think the next one will be much easier.  


These would make a great little hostess gift!

Thanks for stopping by!

~Margie 


The Fake Cupcake 1st Attempt

Well this week I decided I wanted to make some FAKE CUPCAKES for my displays.  I like to take pictures of my party pieces before they are delivered to my clients, so it's nice to actually see them with food included. Sometimes, I run up to the grocery store and purchase a couple dozen cupcakes, but that gets a little dangerous, then I have to eat them after the photo shoot. So making fake cupcakes seemed like a great idea...at the time.  I found a few different instructions on-line, and luckily I had most everything I needed right here at home.  So I decided to give it a try. How hard could it be, right? Well, what started out as a simple, two hour project...ended instead as an all day project and needless to say, I am not crazy about the results! 


The bases all came out ok...not bad.  I might even keep those just in case I want to try again. 

I used a half of Styrofoam ball for the actual cake section.  I painted each one, that took forever!  Pink for strawberry, yellow for vanilla, and brown for chocolate. 


Then I moved on to mixing up a messy batch of Spackle to make the tops with a frosting bag and tips....MESSY, MESSY, MESSY!!! 


BUT, I followed the instructions and after a couple tries, it worked...they really didn't look too bad.  I tinted the Spackle with acrylic paints and was very happy with the outcome. 

I thought everything was going to look great.  

How about some decorations? I needed some sprinkles...something to make them look more realistic.  So I thought, hey, I will use REAL SPRINKLES! Genius...boy they looked great and I was THRILLED to say the least with the results.  Well worth all the effort it took to get to this point.  As they started to dry the die on the sprinkles began to run...and Run and RUN!!!  Drip and worst of all CRACK!!  OMG...drips and cracks...the WORST!!! 

My smiles quickly went to frowns.  I could have cried!

I'll be right back, I am going to the grocery store to pick up a dozen cute cupcakes!  

Tuesday, September 11, 2012

Party Collages

I am adding something new to my blog called Party Collages.  When I put together a party, I usually take several pictures for my blog and write a detailed description of the party. The Party Collage entries, will be all of those pictures grouped together with a   link to the original blog entry.  I think this might just make it a little easier when searching for pictures, tweeting and pinning.  I love working with Pic Monkey ...I better add them to my FAVORITE list!  Many of my collages will be added to the left side of my page under Party Collages for a quick glance.  Have Fun!
  

Friday, September 7, 2012

Pinterest Party

So I thought it might be fun to start a Pinterest Party.  How many times a year are you invite to candle parties, jewelry parties, Tupperware Party (do they have those anymore?)  You know what I mean, we head over to a friends' home, listen to a presentation, have a few drinks, eat munchies and visit...oh and of course place an order!  Don't get me wrong, I do love going to the home parties...but let's try something different.  So many of us are on Pinterest and our friends and family may or may not live close by...we only visit on facebook, it's hard to find time to go to a home party. If you are like me...you pin and pin and pin...it's addicting to say the least. Now we have all these PINS...then what?  Yes, I have made a few recipes, a craft or two...but I really just like collecting them.  So I decided I need to make these pins WORK FOR ME.  Give them a try, and write a review, and post pictures too.    I am going to start with my Facebook Friends to help me on this one and I will post all our results here on my blog on the last Saturday of every month.  Check back  to see what we come up with.  

Watering Can Centerpiece

I thought I would share another watering can centerpiece.  Several months back I made a cute flower centerpiece and a friend added cupcakes to it instead of Cakepops.  Genius!  So this time, I wanted to completely eliminate the handmade paper flower and have something for the cupcake to actually sit on. It needed to be sturdy, but cute.  Don't worry, it's not a balancing act...the mini cupcake has a toothpick inserted in the bottom, right through the the cupcake wrapper, then placed in a Wilton Baking Cup that looks like a petaled flower and then the toothpick is sitting in the end of a decorative straw.  
I used a scalloped circle as my cupcake "plate" and I actually sandwiched two circles back to back to give a little thicker plate...nice and sturdy.  
Just as I use Cakepops, lollipops, and now cupcakes in my bouquets, don't forget ...Fanny May Candies, large sugar coated gumdrops, powdered sugar donuts and so many more goodies will work in this centerpieces as well.  These are adorable as table  centerpieces with a number tag at the very top, or even a get well, happy birthday or congratulations gift....it's really versatile.    Be creative and have fun! 

Thanks for stopping by!
~Margie 

Sunday, September 2, 2012

Sad News to Share

My last blog entry, I gave a sneak peak of a birthday party I was building for a friend and her husbands' twin baby girls.  Their 1st birthday is Tuesday.  They were born premature at 20 weeks, one weighing just under a pound and the other just over a pound!  One twin, I'll call her Baby G., was still hospitalized fighting for her life this whole year.  Numerous surgeries, many close calls, tubes, needles and wires...more than anyone should have to bare in a lifetime.    I can't begin to tell you how my heart bled for this family.  My friend cuts my hair and her husband helped build my workshop and other pieces I am using in my business.  
The party was to be at their home and also a second party in the hospital for Baby G.  I have terrible news to share.  On Friday, I was to drop off the party decor.  I got the worst news...Baby G lost her battle on Friday afternoon.   She fought so hard this whole year...she was such a strong little girl! Now she is their "Little Angel" watching down on her Mommy, Daddy and her twin.  I can't begin to even image what my friends are feeling right now. 
Sorry for not posting any pictures this week. Thanks for stopping by.    
~Margie 


Tuesday, August 28, 2012

Irish Themed Bridal Shower

Last week I worked on a 60 piece bridal shower...30 favors and 30 flowers with an Irish theme.  So I set out in search of 4 leaf clover scrapbook paper...with NO luck!  So, what's a girl to do?  I printed my OWN paper!  I love that option, I didn't even have to leave the office.  I wanted something very simple, not too busy and more white than green.  I found the perfect kit at Nit Wit Collections.  I hold their commercial license so if you are looking for something special, you can check out the site, find your favorites and give me a call.  I probably have the kit and if I don't I will purchase it!  I love their stuff, MaryFran is an amazing artist.
So, I wanted to put a little twist on the bridal dresses...you know me, I can never just cut the darn box and be done with it.  Funny, I actually took a picture of a simple design so you could see exactly how I jazzed it up...you'll laugh at it's simplicity. As for my design...it's one of those...'why didn't I think of that' type boxes!  
The one in the middle is the simple favor box pattern.  I used one sided printed paper, very simple with tag attached.  The 4 leaf clover dress on the right, is the paper I printed.  I added a solid light green paper to the bodice area.  The first one your left, is just a plain white dress with a separate white overlay that is dry embossed and glued to the skirt area. (I turned the printed paper over to the non-printed, plain white side to make the skirt)  The bodice of the printed piece was also used as the ruffle...printed side facing toward the front.  Hope you got all that!  I confuse myself sometimes!

I really, really love the green plaid dress.  I used very inexpensive paper, and added the white embossed overlay to the front.  I jazzed it up with a little bling, added a simple tag with a pop-dot, and a ribbon to the midsection.  I can see so many possibilities with this pattern.  How about red and white checks, or a cherry print?  Maybe add an apron...great 50's party or BBQ favor!  Love, Love, Love that!
Those of you who know this pattern know it had a silly latch in the treat area.  I hated that piece, so I cut it off and tucked in the tabs to make the box a little sturdier.  I added two mini cupcake liners to the inside just so the treat won't slide all around. (they do make rectangular liners that might work as well)

So here's a close up....I just add a little bling to the flower centers.  Really pretty!  I made 59 of these and  1 single favor for the bride with a little bridal tulle attached to the back, as a veil.


Next, I made 6 Pretty Poke single stem bouquets adding a clear lolli to the center (it had a clear, pastel heart candy in center of the sucker) really pretty.  I used the 4 leaf clover paper as a flower, and a white flower layer with a couple cupcake liners to each stem.  I have to say, I get so many questions as to how these flower are assembled.  I wish I could tell you...but it's my own design.  A girl has to keep some secrets to herself.  I will say, it's not in the materials used, or even the layering process.  I use a tool to get it all to work as one.  BELIEVE me ...it took me a long time to come up with this piece.  Maybe Martha Stewart will have me on her show, THEN I can teach you all the How To's! Thanks for understanding.  
   

Ok just a few more pictures of all of the pieces as one party.  I like to set up my orders in my formal living room before I deliver them. 


Lastly, a preview of my next blog entry
Stay tuned.....


Thanks for stopping by!  
~Margie


Sunday, August 19, 2012

Summer Events

This was taken in my formal living room before I delivered the party.
Hi Everyone!  

Whew!  It's been a very busy Summer for me.  June, July and Aug were filled with a lot of fun, fun parties!  A Summer event for 2,000, signage for a Chicago library event, 300 Tinkerbell party favors, a couple of Bar & Bat Mitzvah's, and many samples for future parties.  I have been so busy for the last few months. Oh, how could I forget Maggie's 2nd Birthday (my granddaughter, I'll add a blog entry for her party this week).  In addition to these Summer events, I am working on something new for the Fall....(Top Secret Stuff).  This week I am building centerpieces and favors for a bridal shower and several pieces for a twins flower themed birthday party, I know you will just love. I will post photos AFTER these parties have taken place...I don't want to spoil any surprises. 

One of the most memorable parties this Summer was a Tinkerbell birthday party for a 3 year old little girl. I was hired by my friend Desi, at Desiree Chocolates to build 300 themed favors, cupcake pics, a birthday banner and some tags and menu cards all with the Tinkerbell theme.  So I put on my thinking cap and came up with some darling favors for both girls and boys, which I displayed on a Pottery Barn severing pedestal that served as a pretty neat centerpiece while filled with the favors as well. I used this same sever as a drinking glass tower at my daughter's bridal showers.  I like it so much, I wouldn't mind a second so I can place one on each end of the dessert table.  


With my "thinking cap on" I knew I wanted to use my favorite Double Dot Papers from Bo Bunny.  The color pallet  was Hot Pink, Lime Green, Lemon Yellow...and I threw in a little blue and orange as well.  It all worked perfectly. 


After this never ending pile of scrap paper and a few trips to Archivers, I finally came up with a zillion favors...well 300 darling favors.   I decided to go with a french fry box...easy for the kids to fill up the box with the wonderful desserts from Desiree Chocolates and enjoy the party.  But I needed something with a Tinkerbell theme.  Well I have to say, I am so excited with the end result.  

Tinkerbell got some wings add on.
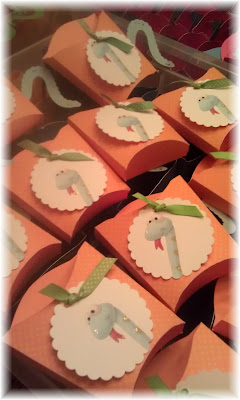
Crock got a tail added on the back of the box.


The snake got a squiggly tail added onto the back of the box.

The lizard, he got a tail too...he was my favorite!

And Captain Hook, got his HOOK added to the back of the box.

As I mentioned, I designed a few pieces for Desi's dessert table as well. She needed matching candy container tags.  If you look under the "Tag" blog entry, you can view how I normally design a tag, but these needed to be a little different.  Desi's candy containers are martini glasses so the normal hang tags wouldn't work.  I came up a different style and I just love the way they turned out.  Fits the stem perfectly.  What do you think?


I also made cupcake picks...both regular and mini size, all with a mixed birthday theme.  Don't forget to add a little "bling" to each one, it's nice to see a bit of shimmer in the light. 


Everything looked so nice, but I have to tell you...it took 3 helpers, myself and 7 full days to completely build this party, working 10 to 12 hours a day.  Yes VERY long, BUT...very worthwhile.  I LOVE every piece.  I have to admit, this was the cutest party I have ever  designed.  I wanted to show you a few more pictures of the process, just in case YOU get a call to design and create 300 party favors...ENJOY!


~Margie